Skip to content
GRENDELMAN.NET
  • Home
  • Photos
  • Projects & Pages
    • Projects
    • Files
    • Humor
    • Bookmarks
  • Login

Post-processing Garmin Zumo track logs

Posted on: Wednesday 29 January 2014 /
Categories: GPS and mapping, Motor, Nerd Stuff, Programming

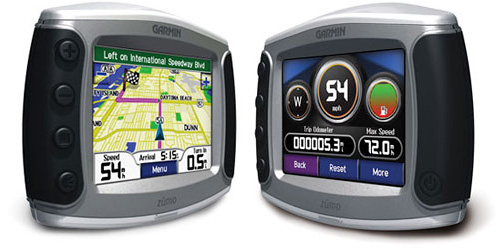
Garmin Zumo 550

Whenever I leave the house to do something interesting (riding my motorcycle, snowboarding, hiking) I take my Garmin Zumo 550 with me, to log my tracks if not for anything else.
The great thing about a device like the Zumo is, that it always logs the GPS location, there is no need to turn that on specifically, so you can’t forget it either. So, if you like taking photographs, and you make sure you have a GPS log, you can easily tag your photos with a location, for example with my Taggert software.

Unfortunately, the Zumo suffers from some annoying bugs, that make using its track logs a little less efficient. As you can read on the linked page, the Zumo creates track archives in GPX files, but sometimes it duplicates data and sometimes it partially duplicates data. Sometimes it duplicates data across different files, but in the worst case, it happens that data is partially duplicated within the same file. This means that you end up with a GPX file, that contains two equally named tracks, one of which is complete and the other one is not. Nice, huh?

The amount of tracks in a single archive file and the timespan they were recorded in are not really predictable. I guess it mostly depends on the total number of track points in all tracks together. For my own purposes, it would be most convenient to have all tracks from a single day together in a single file. And of course, there should be no duplicate tracks and the tracks that remain should be the complete ones.

To post-process the Zumo’s track logs, I created some Python scripts. The README on Github pretty much explains what they do in detail, but in short, they do what is necessary to get what I want:

  • One file per day, containing all tracks for that day
  • Only the complete tracks are kept, (incomplete) duplicates are discarded

The scripts are written in -and tested on- Python 2.7 on Linux, but since they don’t have any external dependencies, I don’t see why they shouldn’t work on Windows or other platforms as well. They are released under the Apache 2.0 license. Please use them as you see fit.

Luchtfoto’s

Posted on: Monday 30 December 2013 /
Categories: Photography

Gisteren voor het eerst gevlogen met een GoPro bovenop mijn AeroQuad. Hier twee snapshots: Eindhoven vanuit de lucht (klik om te vergroten):

eindhovenvanboven001

eindhovenvanboven002

Tags: aeroquad, photography, quadcopter

Glow 2013

Posted on: Sunday 17 November 2013 /
Categories: Photography

Van 9 t/m 16 werd het jaarlijkse evenement Glow weer gehouden in de binnenstad van Eindhoven en op Strijp-S.

Hieronder mijn impressie van een aantal van de objecten:

IMG_7993.JPG

2013-11-13 20:16:30
© 2013 Martijn Grendelman
IMG_8006.JPG

2013-11-13 20:34:15
© 2013 Martijn Grendelman
IMG_8010.JPG

2013-11-13 20:35:51
© 2013 Martijn Grendelman
IMG_8021.JPG

2013-11-13 20:46:42
© 2013 Martijn Grendelman
IMG_8024.JPG

2013-11-13 20:54:27
© 2013 Martijn Grendelman
IMG_8025.JPG

2013-11-13 20:55:09
© 2013 Martijn Grendelman
IMG_8026.JPG

2013-11-13 20:55:58
© 2013 Martijn Grendelman
IMG_8031.JPG

2013-11-13 20:57:46
© 2013 Martijn Grendelman
IMG_8032.JPG

2013-11-13 20:59:10
© 2013 Martijn Grendelman
IMG_8042.JPG

2013-11-13 21:20:02
© 2013 Martijn Grendelman
IMG_8047.JPG

2013-11-13 21:26:07
© 2013 Martijn Grendelman
IMG_8053.JPG

2013-11-13 21:29:41
© 2013 Martijn Grendelman
IMG_8060.JPG

2013-11-13 21:41:28
© 2013 Martijn Grendelman
IMG_8062.JPG

2013-11-13 21:42:33
© 2013 Martijn Grendelman
IMG_8066.JPG

2013-11-13 21:44:14
© 2013 Martijn Grendelman
IMG_8069.JPG

2013-11-13 21:45:19
© 2013 Martijn Grendelman
IMG_8076.JPG

2013-11-13 21:47:51
© 2013 Martijn Grendelman
IMG_8077.JPG

2013-11-13 21:48:21
© 2013 Martijn Grendelman
IMG_8082.JPG

2013-11-13 21:49:32
© 2013 Martijn Grendelman
IMG_8083.JPG

2013-11-13 21:50:06
© 2013 Martijn Grendelman
IMG_8089.JPG

2013-11-14 19:46:26
© 2013 Martijn Grendelman
IMG_8091.JPG

2013-11-14 19:47:23
© 2013 Martijn Grendelman
IMG_8094.JPG

2013-11-14 19:49:05
© 2013 Martijn Grendelman
IMG_8095.JPG

2013-11-14 19:59:44
© 2013 Martijn Grendelman
IMG_8102.JPG

2013-11-14 20:10:39
© 2013 Martijn Grendelman
IMG_8105.JPG

2013-11-14 20:11:26
© 2013 Martijn Grendelman
IMG_8110.JPG

2013-11-14 20:22:40
© 2013 Martijn Grendelman
IMG_8111.JPG

2013-11-14 20:27:24
© 2013 Martijn Grendelman
IMG_8118.JPG

2013-11-14 20:34:55
© 2013 Martijn Grendelman
IMG_8121.JPG

2013-11-14 20:36:04
© 2013 Martijn Grendelman
IMG_8123.JPG

2013-11-14 20:38:12
© 2013 Martijn Grendelman
IMG_8126.JPG

2013-11-14 20:41:46
© 2013 Martijn Grendelman
IMG_8129.JPG

2013-11-14 20:45:54
© 2013 Martijn Grendelman
IMG_8141.JPG

2013-11-14 21:08:28
© 2013 Martijn Grendelman
IMG_8148.JPG

2013-11-14 21:09:39
© 2013 Martijn Grendelman

Met dank aan Marjolein van Hout voor een leuke workshop. Meer foto’s van Glow zijn te vinden bij het Eindhovens Dagblad.

Sunset over Eindhoven

Posted on: Wednesday 13 November 2013 /
Categories: Photography

AeroQuad build, part 3

Posted on: Friday 4 October 2013 /
Categories: Nerd Stuff
  1. Building a quadcopter
  2. First steps with Arduino
  3. Quadcoper project rebooted
  4. AeroQuad build, part 1
  5. AeroQuad build, part 2

This is 6th post in a series about building an AeroQuad open source quadcopter, and it’s long overdue, considering that my quad has been in a flying state for almost a month.

In my last post, I summed up the things I still needed to do to get there:

  • Connect motors to ESCs
  • Add Arduino power feed to power distribution hub
  • Create extra level for mounting the flight controller on the frame

So, the 3 motor-side wires on each ESC were extended using 14AWG silicone wire. Those wires run through the carbon fibre arms of the Talon V2 frame:

IMG_7937e

The connectors on the motors and on the wires just click together, and they are isolated with shrink wrap. However, this cannot be done at this stage, because the spinning direction of the motors has yet to be determined. The motors are first wired randomly, and later, when a motor turns out to spin in the wrong direction, two of the wires have to be switched. This procedure is part of the calibration, which I am (most conveniently) not going to cover in this post.

For the extra level, I bought some more materials:

  • Epoxy plate, 1,5mm thick. Cost: € 12.99
  • Some M3 Nylon Threaded Spacers. Cost: US$ 3.68
  • Some M3x12mm Nylon Screws. Cost US$ 2.04
  • M3 Nylon Nuts. Cost: US$ 0.80. Last 3 items added US$ 1.43 for shipping.

I cut a disc out of the epoxy plate, large enough to fit the flight controller, and fitted some nylon spacers on to it. I also added 4 holes for mounting the plate onto the Talon frame. The frame comes with some nylon spacers, meant for mounting a flight controller directly on top of it, and I use those positions for attaching the plate.

IMG_7940
IMG_7941

It is important to note which is the front side of the quad (see the small pencil-drawn arrow on the mounting plate). The flight controller has to be mounted with one specific side pointing forward. I will be flying in Quad-X mode, meaning that the front of the quad is in the middle between two arms. The mounting holes in the plate are positioned exactly right for this configuration.

Here’s an idea of how it looks when everything is stacked together:

IMG_7942
  • Talon V2 frame with power distribution inside
  • ESCs strapped on the top plate of the frame, with motor-side wires on the inside, and power supply and controller wires on the outside
  • Epoxy plate mounted on the frame, with leads from the ESCs and the power supply wires for the Arduino coming through the hole in the center of the plate
  • Arduino mounted on top of the plate

The AeroQuad shield is missing from this picture, as is one other important part: the 2.4 Ghz receiver!

RX-9X8Cv2

I actually forgot about the receiver when I placed my last order with Hobbyking, and this meant I had no wires to hook the receiver up to the flight controller. Add to your shopping list:

  • 10CM Male to Male Servo Lead (JR) 26AWG (10pcs/set). Cost: US$ 4.51 + US$ 1.43 shipping.

Now, putting it all together is not very difficult anymore. The things I’m going to skip for now are:

  • Adding a battery. I use a strap to attach it to the bottom plate of the frame.
  • Wiring the motors and the receiver to the AeroQuad shield
  • Calibrating the quad and all of the sensors with the AeroQuad Configurator software
  • Pairing transmitter and receiver and configuring AUX channels on the transmitter
  • Adding propellors

Fast forward to the (more or less) finished product:

IMG_7949
IMG_6283

Its maiden flight was on 8 September 2013.

Total expenses: US$ 593.04 + € 25.89, but that excludes some things I forgot to count:

  • 3.5mm polymax connectors
  • Lots and lots of tie-wraps 🙂

I think I’ll dedicate a later post to the complete shopping list.

Tags: aeroquad, arduino, multicopter, quadcopter
« 1 … 4 5 6 7 8 … 27 »

Today's motto

There is a crack, a crack in everything. That’s how the light gets in.

— L. Cohen

Categories

Recent Posts

  • Trackserver v4.0 released
  • Panoramas Chamrousse
  • Dierenrijk
  • Schwarzwald panoramas
  • Trackserver v3.0 released

Meta

  • Log in
  • Entries feed
  • Comments feed
  • WordPress.org

Tags

aeroquad android arduino backports camera cat debian Digikam docker garmin Google GPS gpsbabel KDE kernel launchpad linux lowlands maps multicopter Natty oracle oruxmaps osmand owntracks pannellum phishing photography photo sphere pi plugin policykit quadcopter raspberry raspberry pi shield software spam tracking trackme Ubuntu viking wheezy wordpress Zümo

Copyright GRENDELMAN.NET 2023 | Theme by Theme in Progress | Proudly powered by WordPress