Tag : multicopter

AeroQuad build, part 3

  1. Building a quadcopter
  2. First steps with Arduino
  3. Quadcoper project rebooted
  4. AeroQuad build, part 1
  5. AeroQuad build, part 2

This is 6th post in a series about building an AeroQuad open source quadcopter, and it’s long overdue, considering that my quad has been in a flying state for almost a month.

In my last post, I summed up the things I still needed to do to get there:

  • Connect motors to ESCs
  • Add Arduino power feed to power distribution hub
  • Create extra level for mounting the flight controller on the frame

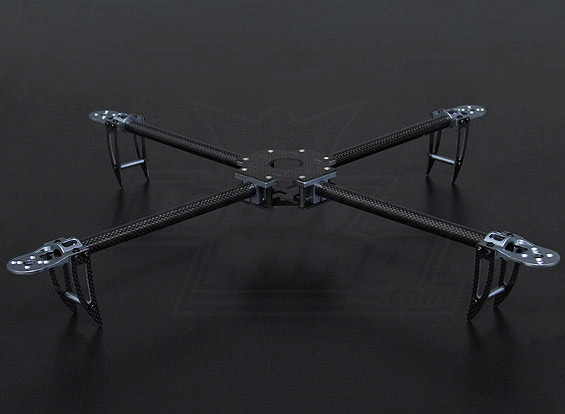
So, the 3 motor-side wires on each ESC were extended using 14AWG silicone wire. Those wires run through the carbon fibre arms of the Talon V2 frame:

The connectors on the motors and on the wires just click together, and they are isolated with shrink wrap. However, this cannot be done at this stage, because the spinning direction of the motors has yet to be determined. The motors are first wired randomly, and later, when a motor turns out to spin in the wrong direction, two of the wires have to be switched. This procedure is part of the calibration, which I am (most conveniently) not going to cover in this post.

For the extra level, I bought some more materials:

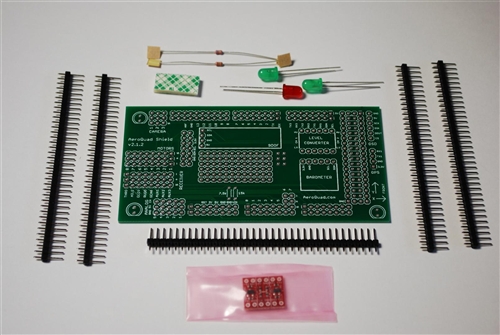
I cut a disc out of the epoxy plate, large enough to fit the flight controller, and fitted some nylon spacers on to it. I also added 4 holes for mounting the plate onto the Talon frame. The frame comes with some nylon spacers, meant for mounting a flight controller directly on top of it, and I use those positions for attaching the plate.

It is important to note which is the front side of the quad (see the small pencil-drawn arrow on the mounting plate). The flight controller has to be mounted with one specific side pointing forward. I will be flying in Quad-X mode, meaning that the front of the quad is in the middle between two arms. The mounting holes in the plate are positioned exactly right for this configuration.

Here’s an idea of how it looks when everything is stacked together:

  • Talon V2 frame with power distribution inside
  • ESCs strapped on the top plate of the frame, with motor-side wires on the inside, and power supply and controller wires on the outside
  • Epoxy plate mounted on the frame, with leads from the ESCs and the power supply wires for the Arduino coming through the hole in the center of the plate
  • Arduino mounted on top of the plate

The AeroQuad shield is missing from this picture, as is one other important part: the 2.4 Ghz receiver!

I actually forgot about the receiver when I placed my last order with Hobbyking, and this meant I had no wires to hook the receiver up to the flight controller. Add to your shopping list:

Now, putting it all together is not very difficult anymore. The things I’m going to skip for now are:

  • Adding a battery. I use a strap to attach it to the bottom plate of the frame.
  • Wiring the motors and the receiver to the AeroQuad shield
  • Calibrating the quad and all of the sensors with the AeroQuad Configurator software
  • Pairing transmitter and receiver and configuring AUX channels on the transmitter
  • Adding propellors

Fast forward to the (more or less) finished product:

Its maiden flight was on 8 September 2013.

Total expenses: US$ 593.04 + € 25.89, but that excludes some things I forgot to count:

  • 3.5mm polymax connectors
  • Lots and lots of tie-wraps 🙂

I think I’ll dedicate a later post to the complete shopping list.

AeroQuad build, part 2

  1. Building a quadcopter
  2. First steps with Arduino
  3. Quadcoper project rebooted
  4. AeroQuad build, part 1

Another week or two has passed, and although I have mostly been waiting for ordered parts and materials to arrive, I did some work on the AeroQuad, mostly soldering.

Power Distribution Hub

In my previous post, I showed the work I had done on the power distribution hub. After I received the EC3 connectors that I ordered, I finished the hub, so now it looks like this. In the second picture, the hub is mounted on the bottom plate of the Talon frame. The only thing missing from this part is the power line for the AeroQuad flight controller. The Arduino will get a direct feed from the battery.

I also equipped all the ESCs with the male end of the EC3 connectors:

Also, in my last post I wrote that I extended the three motor-side wires on each ESC with 18AWG silicone wire. At some point, I decided that 18AWG would be too thin for the motors, and I redid the work with 14AWG wire.

Extra materials bought in this episode:

Total expenses so far: US$ 579.15 + € 12.90.

AeroQuad Flight Controller

The second part of this post is about the flight controller. If you go back to my very first post about this project, you can see that the flight controller is made from an Arduino Mega 2560 microcontroller, expanded with a custom-made AeroQuad Shield, that looks like this when it comes in the mail:

AeroQuad shield

After soldering all the pieces together, carefully following the AeroQuad manual, the shield can be mounted on the Arduino. The result looks like this (hopefully I’ll be able to replace the picture with a better one sometime):

Today, I hooked it up to my computer, after installing the following software (* unfortunately, the AeroQuad Configurator only runs on Windows and Mac, not Linux, so for someone using Linux for almost everything, that’s a really sad thing):

The software looks overwhelming at first, but once you click around a little bit, it all seems easy enough. All the necessary steps (uploading software, initializing settings, sensor calibration) are all lined up in easy to find buttons, and so far everything I have tried just worked.

There’s probably a lot to tell about the software, and I have only just made my first steps, but I’ll give you one screenshot. After initializing the software and performing some sensor calibrations, you can select a screen called ‘Sensor data’, that presents a real-time graph of all the sensor output from the AeroQuad shield:

That’s all for now. Next steps:

  • Connect motors to ESCs
  • Add Arduino power feed to power distribution hub
  • Create extra level for mounting the flight controller on the frame

Next: AeroQuad build, part 3

AeroQuad build, part 1

A few weeks ago, I rebooted my quadcoper project and ordered a lot of parts from Hobbyking. In the mean time, the parts arrived, and I have been making my first steps in actually building something.

The first thing was assembling the Talon V2.0 carbon fiber frame and mounting the motors. That’s a very easy task, except when trying to fit some props on the motors after mounting them on the frame, I discovered that the Turnigy 2217 motors should be mounted up-side down, so the motor-mounts on the frame had to be flipped. Click the images to enlarge.

The next thing on the list was the power system, meaning everything to connect the motors to the ESCs and the ESCs to the battery. For this, I needed some extra hardware, that I got from different sources:

Total expenses for these parts: € 12.90.

First I extended the 3 motor-side wires of every ESC to make them long enough to span the booms of the frame. I just soldered the wires together and covered the joint in shrink tub02e.

Next, I prepared the power distribution hub, by soldering the wires and the HXT connector to it:

To complete the power system, I need 12 connectors to connect the motors to the ESCs. I probably should get some of these 3.5mm “PolyMax” connectors, but I’d rather get them at a local shop and I haven’t been able to find any just yet.

So that’s what has been done so far.

In the mean time, I ordered some more stuff from Hobbyking:

  • the Turnigy 9X Transmitter & Receiver (Mode 2). Hey, it’s probably a piece of junk, but I have to start somewhere, and this one I can afford right now. Cost: US$ 53.82 and US$ 27.55 for shipping, makes US$ 81.37 in total.
  • a bunch of EC3 connectors , that I am going to use to connect to ESCs to the power distribution hub. Cost: US$ 6.88 including shipping.

That brings the grand total of all expenses so far at US$ 573.19 + € 12.90.

And there is one more problem to solve. Since the Talon frame is pretty compact, it doesn’t offer enough space for all the components. The top plate will used to house the ESCs, like so:

An extra level on top of that is needed to house the Arduino with the AeroQuad shield and the R/C receiver. This level has to be a little bit bigger than the plates of the Talon frame, otherwise there will not be enough room for all the parts.

Fitting an extra level on top of the Talon frame is easy enough. I could use the nylon spacers that came with the frame, or I could easily make some custom spacers using threaded wire. An important question is what material to use: aluminium, wood, plastic? It should be strong, yet light. And affordable. I decided to go with 1.5mm thick epoxy plate. Unfortunately, due to a small error on Conrad’s website, I now have a piece of 0.5mm thick epoxy plate at home, which is too flexible to use. I’ll have to exchange that for the right stuff.

So, the current situation is:

  • Frame needs an extra level. Correct epoxy plate not yet ordered. Also need a dome or some other protection for the electronics during flight.
  • Power system: need to buy connectors for motor-to-ESC connections and waiting for EC3 connectors to connect ESCs to power distribution hub. Otherwise finished.
  • Flight electronics: AeroQuad shield soldering halfway finished. Pictures of that in the next post. Software not yet loaded onto the Arduino, but installed on my computer.
  • 2.4 GHz transmitter/receiver pair is on its way.

Next: AeroQuad Build, part 2.

Quadcoper project rebooted

A year ago tomorrow, I wrote about building an AeroQuad open source quadcopter.

At that time, I had ordered the electronics for the flight controller:

but I left it at that and didn’t actually build anything. I won’t go into the reasons why, I just didn’t.

But! That doesn’t mean that I haven’t been thinking about the project in the mean time. I have been studying the do’s and don’ts of building a quad, reading about motors, ESCs, LiPo batteries, propellors, currents, temperatures, frame characteristics and lots of other complexities. I also tried to get an idea of what flying a quadcopter is all about.

As a matter of fact, I purchased a really small and cheap toy quad from DX a while ago, that has been a lot of fun and it taught me the basics of how to fly a quadcopter. Last weekend, I got to fly a Parrot AR Drone with an onboard camera, and that got me excited enough to reboot the AeroQuad project!

So last night, I sat down to take a last long hard look at all the components I had considered before, and placed a big order with Hobbyking. These are the components I ordered. All prices in US$.

So that amounts to a total of US$ 257.66, excluding an outrageous amount of US$ 35.80 for shipping. That brings the total investment so far up to US$ 484,94. Damn, this better become one hell of a flying machine 😉 And I still need to buy a 2.4 GHz transmitter/receiver, too…

I bought two different kinds of props: two sets of 10×4.5 SF props and three sets of 10×6 props. These give different amounts of thrust and flying time, but also a difference in handling and stability of the quad. I’ll have to experiment with those.

One of the high-impact decisions I made, both in terms of cost (probably) and in complexity of the build, is to buy a ready-made frame. I chose Hobbyking’s own Turnigy Talon Quadcopter (V2.0) Carbon Fiber Frame, and it looks like this:

Talon frame

Of course it still going to take some time and effort to get everything mounted on there, but at least I can be sure that the frame is well-balanced and light, yet very strong. The frame only weighs 280 grams, and hopefully this will allow me to keep the total weight of the quad, including motors and battery, around 1 kg. If my (or rather: eCalc’s ;-)) calculations are correct, the quad will be able to carry a payload of at least another 1 kg, which should be plenty for a camera of any sort, and leaves room for more accessories.

Now I’ll have to wait for all the parts to arrive, and then the building can begin. More later!

Next: AeroQuad Build, part 1