AeroQuad build, part 2
Another week or two has passed, and although I have mostly been waiting for ordered parts and materials to arrive, I did some work on the AeroQuad, mostly soldering.
Power Distribution Hub
In my previous post, I showed the work I had done on the power distribution hub. After I received the EC3 connectors that I ordered, I finished the hub, so now it looks like this. In the second picture, the hub is mounted on the bottom plate of the Talon frame. The only thing missing from this part is the power line for the AeroQuad flight controller. The Arduino will get a direct feed from the battery.


I also equipped all the ESCs with the male end of the EC3 connectors:


Also, in my last post I wrote that I extended the three motor-side wires on each ESC with 18AWG silicone wire. At some point, I decided that 18AWG would be too thin for the motors, and I redid the work with 14AWG wire.
Extra materials bought in this episode:
- 3m of 14AWG silicone wire, cost: US$ 1,51 /m, total US$ 5.96 incl. shipping
Total expenses so far: US$ 579.15 + € 12.90.
AeroQuad Flight Controller
The second part of this post is about the flight controller. If you go back to my very first post about this project, you can see that the flight controller is made from an Arduino Mega 2560 microcontroller, expanded with a custom-made AeroQuad Shield, that looks like this when it comes in the mail:
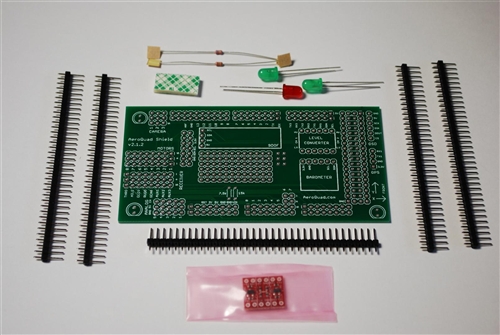
After soldering all the pieces together, carefully following the AeroQuad manual, the shield can be mounted on the Arduino. The result looks like this (hopefully I’ll be able to replace the picture with a better one sometime):

Today, I hooked it up to my computer, after installing the following software (* unfortunately, the AeroQuad Configurator only runs on Windows and Mac, not Linux, so for someone using Linux for almost everything, that’s a really sad thing):
- Arduino 1.0.5 (Windows installer)
- AeroQuad Configurator 3.2
- AeroQuad flight software 3.2 (from the same page)
The software looks overwhelming at first, but once you click around a little bit, it all seems easy enough. All the necessary steps (uploading software, initializing settings, sensor calibration) are all lined up in easy to find buttons, and so far everything I have tried just worked.
There’s probably a lot to tell about the software, and I have only just made my first steps, but I’ll give you one screenshot. After initializing the software and performing some sensor calibrations, you can select a screen called ‘Sensor data’, that presents a real-time graph of all the sensor output from the AeroQuad shield:

That’s all for now. Next steps:
- Connect motors to ESCs
- Add Arduino power feed to power distribution hub
- Create extra level for mounting the flight controller on the frame
Next: AeroQuad build, part 3