Category : Nerd Stuff

Trackserver v5.0 released

So… here we are! A new version of my Trackserver WordPress plugin was released! If you don’t know what Trackserver is, please have a look at its dedicated page on this website and the plugin’s details on WordPress.org.

Almost five years have passed since the last major release, and the last minor release, v4.3.2, was more than three years ago. In the first few months after the last release, a lot of work was done on restructuring the plugin, but the job at hand turned out to be bigger than expected, and before I could finish it, life got in the way.

So here’s a small disclaimer: after so much time, and so many failed attempts to release a new version, I decided to just do it: release a new version on WordPress.org, exactly as it currently is on Github. This means that some features, and most notably the upgrade process have not been tested very well. Version 4.3.2 is old, and I have always been running the latest code myself. It also means that not every known issue that may still be present in v5.0 is fixed. If things don’t work for you the way you expect, I apologize. Please open an issue, preferably on Github, and I’ll try to help you as well as I can.

As with every major release, there are a few big changes that deserve some special attention. Here we go.

Universal URL slug for all supported apps

In earlier versions of Trackserver, each supported client app (TrackMe, OruxMaps, etc.) had its own URL slug, which allowed Trackserver to quickly pick a the right protocol to listen for.

Trackserver v5 introduces a new universal slug, that can be used in all supported clients. The server will use different heuristics to pick the correct protocol. This means that all clients have to be reconfigured to use the new slug, which is ‘trackserver’ by default. You can configure the slug in Trackserver’s options.

To illustrate this with an example:

With v4, in TrackMe, you would use https://yourhost/wp/trackme in the ‘URL Header’ setting.

In OruxMaps, you would use https://yourhost/wp/mapmytracks.

With v5, you would use https://yourhost/wp/trackserver in either of them!

Your Trackserver profile in the WordPress backend will display this URL at the top of the page. The old, app-specific URL slugs still work in Trackserver v5.0, so nothing will break right away, but they are marked deprecated in the options page, and they will be removed in a future version.

The universal URL does, however, take two different forms. It is possible to embed authentication credentials in the URL, for apps that do not support a more secure method of authentication, like HTTP POST or HTTP basic authentication. TrackMe, OsmAnd and SendLocation are the known clients that need this. In earlier versions this was already possible (and necessary) for some apps, while for example OsmAnd would normally be configured to send the credentials as URL parameters (?username=abc&password=xyz). In v5, I decided to standardize this on having the credentials in the URL as components, rather than as parameters, although the parameters still work. For named apps, the Trackserver URL would look like this:

https://yourhost/wp/trackserver/<username>/<password>

Either of these methods are inherently insecure, because the credentials will likely be logged in the webserver’s access logs. That’s why Trackserver stopped requiring your WordPress password for these apps a long time ago. And please, please, please.. always use HTTPS!!

And that brings me to the second big change that needs some more explanation.

App passwords

In earlier versions of Trackserver, there were different authentication credentials for different apps:

  • Some apps (OruxMaps, OwnTracks) were considered secure enough to use your WordPress password.
  • For the other apps, each one had a different ‘secret’ in your Trackserver profile.

Apart from the confusion and the hassle of managing all these different secrets, there was the problem of sites that use SSO for logging in to WordPress, in which case users don’t really have WordPress password to use with Trackserver.

In version 5, these app-specific passwords and access keys have been transformed into ‘App Passwords’, and are now app-independent. Existing access keys are automatically converted to App Passwords during the upgrade, and will all be valid for all supported apps, including the apps that worked with your WordPress password before.

Your WordPress password will still work for those apps, but that may change in a future release. Switching to App Passwords is recommended, regardless of the app you use for tracking. The main benefit is an increase in security, because your WordPress password will no longer be necessary for using Trackserver. Trackserver App Passwords can be changed often without impacting WordPress logins. As an added bonus, App Passwords also work in WordPress installs that use SSO mechanisms like OAuth2 for user logins.

App passwords can be managed in your Trackserver profile. They also have permissions attached to them: ‘read’, ‘write’ and/or ‘delete’. Most apps only create tracks and send location updates, and they would only need ‘write’ permission for that. If you configure an app password with only write permissions, it cannot be used to download your tracks or delete anything, in case it would fall into the wrong hands.

Some apps, like TrackMe for example, have functionality that requires read and/or delete permissions. If you use that functionality, you have to configure an app password with appropriate permissions. But even TrackMe can be used for online tracking with only write permissions.

Other changes

There were also a lot of more or less minor changes, that I should mention here:

  • You can now search / filter tracks with a search box at the top of the tracks list.
  • A bulk action for duplicating tracks was added.
  • The PHP code was restructured in a major way, separating code into different classes in a logical way.
  • Leaflet was updated to version 1.9.3.
  • Experimental support for µlogger.
  • Numerous small changes and fixes, improving usability, robustness and error handling.

A complete list of changes can be found in the changelog.

No changes at all were made in the shortcode or the presentation side of things.

Trackserver v4.0 released

After another year of slow development, Trackserver v4.0 was released today. If you don’t know what trackserver is, you can read about it on its dedicated page on this website.

I will update this post later with some more in-depth information and some nice screenshots. For now, I’m afraid I will have to keep it down to the changelog, which you can find below. Where v3.0 was a big update on the front-end, the changes in v4.0 are much more in the back-end. Most of the work has been done in the WordPress admin, a little work was done in client / protocol support for live tracking (geofencing!) and a few minor improvements on the presentation side. Only one new shortcode parameter this time, and no real changes to existing ones.

Version 4.0 is the first version to feature a tangible contribution from someone other than myself. Thanks must go to Dainius Kaupaitis, who contributed a Lithuanian translation.

Here are the changes, plain and simple:

Added

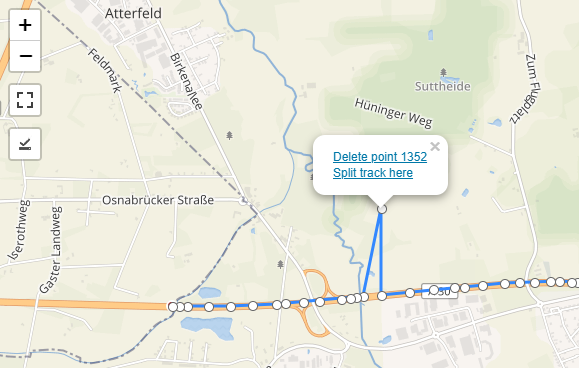
  • A track editor in the WP admin, based on Leaflet.Editable. It allows you to move and delete track points and split tracks.
  • Bulk action for viewing multiple tracks at once in the admin. Editing them also works.
  • Geofencing support, allowing you to hide or drop location updates within certain areas.
  • A proxy for external KML and GPX tracks, to work around CORS restrictions.
  • ‘maxage’ shortcode parameter to impose time-based limit on live tracks.
  • OwnTracks HTTP support, locations request handling only for now.
  • Bulk action for downloading tracks as GPX.
  • A {distance} tag for infobar template, for total track distance in meters.
  • Information about live tracking URLs and howto’s for mobile apps on the user’s Trackserver profile.
  • Information on how to use live tracking in OsmAnd.
  • Lithuanian translation, thanks to Dainius Kaupaitis.
  • PHP coding style checks and automated testing with TravisCI.

Changed

  • Make the ‘infobar’ shortcode attribute accept a string, to override the template set in the user profile.
  • Show a popup on the map with an internationalized message when there are no tracks to display.
  • When a (live) track that is currently shown on the map is no longer present in the server response, show a nice popup, suggesting a page reload.
  • Limit the TrackMe ‘gettriplist’ command to the 25 latest tracks, serve them in reverse order.
  • Increase WP-admin ‘View track’ modal window size to 1024×768.
  • Updated Polyline encoder from Eric McConville to v1.3.
  • Updated Leaflet to version 1.3.1.
  • Updated Leaflet-fullscreen to version 1.0.2.

Fixed

  • In JavaScript, store track information from the server more reliably.
  • Improve HTTP responses around authentication failure.
  • Recalculate the total track distance after merging multiple tracks.
  • Easier access to Leaflet map object from 3rd party JavaScript (issue #9).
  • Handle localized decimal numbers from SendLocation (issue #12).
  • Some minor JavaScript and PHP issues.
  • Many many many PHP coding style fixes.

Trackserver v3.0 released

Almost 14 months after the last big update, Trackserver v3.0 was released today. Since this is quite a big update, with lots of new features and improvements mainly on the presentation side, I thought I’d spend another blog post on it. If you don’t know what Trackserver is, you can read my initial blog post on it, and the update on v2.0 in December 2015. I will present some demos at the end of this post to give you a better idea.

First I will sum up some of the smaller changes. I will get to the big ones later.

  • Leaflet was updated from 0.7.7 to v1.0.3. This brings in all the great work that the creators of Leaflet have done for their 1.0 release in September 2016. For Trackserver, this mainly means performance improvements, not to mention the mere joy of having up-to-date dependencies 🙂
  • Our own hacked version of Leaflet-omnivore was synchronized with version 0.3.4.
  • The PNG images that served as markers to indicate the start and the end of a track have been replaced by L.CircleMarker objects. These objects were already used for ‘points’ style tracks that were added in v2.2 and now also for the normal markers.
  • The infobar that’s available on live maps gained some extra tags: {userid}, {userlogin} and {displayname}, only the last of which is somewhat interesting, I guess…
  • Bugfixes!

All the tracks

Perhaps the biggest change is in the communication between the server side of Trackserver and the JavaScript that is responsible for creating the maps and drawing the tracks. Trackserver has since long distinguished between 3 basic types of tracks:

  1. Static tracks from the Trackserver database, referred to by their ID
  2. Live tracks from the Trackserver database, referred to by the word ‘live’
  3. External tracks in GPX or KML format, referred to by their URL

It was possible to mix these types, but in very limited ways. On top of that, each track, regardless of the type, was downloaded separately, one HTTP request per track. For maps with a lot of tracks, that wasn’t the best design, performance-wise. Both these shortcomings led to a new scheme for getting tracks from Trackserver.

  • First of all, it is now possible to mix all types of tracks in unlimited numbers. Just specify track=a,b,c user=@,x,y,z gpx="URL1 URL2" kml=URL3 and you get them all in one map. The ‘@’ in the user attribute, by the way, is a shortcut for your own username, so user=@ becomes a replacement for track=live, and the former is preferred as of Trackserver 3.0.
  • All the tracks that need to be downloaded from Trackserver are downloaded in a single HTTP request.
  • You can show multiple users’ live tracks in a single map. The live update feature can only ‘follow’ one of them, but the red markers that mark the current locations can be clicked to start following that particular track. The infobar will display the info for the track that is currently followed. On page load, the map will follow the first user that is listed in the user attribute.
  • The new track loading mechanism makes use of JavaScript promises, which are somewhat of a novelty (Chrome >= 49, Firefox >= 50, Edge >= 14, Safari >= 10, all except Chrome released late 2016. No version of MSIE supports them). A polyfill for this is included and loaded automatically to support older browsers. There are multiple Promise polyfills to choose from on the web, but I went for this one, by Taylor Hakes.

Don’t forget: if you want to display GPX or KML files, you are bound to the limitations of CORS.

Shortcode attributes

The [tsmap] shortcode gained some attributes for more control over the maps and how the tracks are displayed:

    • As explained above, the user attibute is now used to specify one or more users’ live maps. You need the ‘trackserver_publish’ capability to publish other people’s tracks. This capability is granted to administrators and editors by default.
    • The live attribute can be used to force enable or disable live-updates. For example, this can be used to turn any track (even an externally hosted GPX file!) into a live track.
    • The zoom attribute can be used for some control on the initial zoom factor when the track is first drawn. This is most useful with maps that have live tracks, because Trackserver would normally zoom in on the latest position in the track, rendering other tracks invisible without zooming out first. For live maps, the argument to the zoom attribute is absolute: what you set is what you get. For maps that have no live tracks, the behaviour is a bit different. By default, Trackserver chooses the zoom factor that makes the best fit for all tracks combined. In this case, the zoom attribute serves as an upper limit, a maximum zoom level, so you can use it to zoom out (but not in) the initial view.

Tracks with style

Trackserver already had some options to style your tracks: markers, color, weight, opacity and (since v2.2) points. However, these style options were per-map, rather than per-track. You would have all markers, or no markers at all. You could have really fat, purple lines for your tracks, but you would have them for all tracks.

Not any longer.

All the styling options now support comma-separated lists of values. Multiple values in such a list will be applied to the specified tracks in order. For example:

[tsmap track=1,2 color=red,#8400ff weight=1 points=n,y]

will draw two tracks on the map: ID 1 in a really thin red line and ID 2 in a collection of purpleish points. I think you get the idea. If less values than tracks are given, the last value is applied to all remaining tracks, so track=1,2,3,4,5 color=red,blue will give you one red track (ID 1) and four blue ones (IDs 2-5).

There is one thing to keep in mind though, when you specify multiple values. While track order will be preserved within each track type, different track types are evaluated in a specific order, and styling values are applied in that order too. The order is:

  1. Static tracks (track=a,b,c)
  2. Live user tracks (user=x,y,z)
  3. GPX tracks (gpx=…)
  4. KML tracks (kml=…)

Example: [tsmap gpx=/url/for/file.gpx user=jim track=10,99 color=red,blue,green,yellow]

In this case, the GPX track will be yellow, Jim’s live track will be green and tracks 10 and 99 will be red and blue respectively.

GPX downloads

Trackserver has a new shortcode: [tslink], perhaps not the most intuitive name. This shortcode produces a link, with which the specified tracks can be downloaded as a GPX file. Other formats are on the horizon, please open a feature request issue on Github if you need a specific format. [tslink] is used almost the same as [tsmap], except that it lacks all the styling attributes.

[tslink track=12,87,525 user=patrick]

will give you a link to a dynamically generated GPX file, containing tracks with IDs 12, 87 and 525, as well as Patrick’s latest track. There is also a class attribute that can be used for styling the resulting <a> element, and a format attribute whose only valid value is ‘gpx’ at this time.

What do you think?

If you use Trackserver, I would LOVE to know about it!! If you have problems with it, please open a support request or an issue in Github. If you are happy with it, please leave a review. And if you absolutely love it, please consider a small donation to support development. It will be much appreciated!

Demo time

A bigger collection of demos can be found on this dedicated demo page, but here are just a couple of them to give you an idea:

[tsmap user=trackserver1]:


[tsmap track=564,575,656,657,658,625,627,628,629,622,623,624,619,618,620,621,647,630,646,648,653,655 color=black,blue,red,green,#8400ff weight=2 continuous=y opacity=1]


Trackserver v2.0 released

This evening, I released Trackserver version 2.0. If you don’t know what Trackserver is, please read my introductory post.

The v2.0 update contains many changes and some interesting new features:

  • It is now possible to add multiple tracks to a single map, by giving a comma-separated list of track IDs to the track parameter of the [tsmap] shortcode. You can also mix static tracks and live tracking in a single map, for example [tsmap track=12,84,live]
  • For maps with track=live, an information bar can be shown at the top of the map with some data about the latest track point. Add infobar=yes to the shortcode parameters. The content of the infobar can be formatted using a template that can be specified in the Trackserver user profile.
  • Experimental support for the SendLocation iOS app. This has not yet been tested with the actual app, but it works in theory. Please test this if you own an iOS device and a willing to spend the 99 cents for the app.
  • Upload via the WordPress admin and HTTP POST now accept GPX 1.0 files in addition to GPX 1.1. It seems that some modern software (most notably Viking) still creates GPX 1.0 files 🙁
  • The Leaflet JavaScript library was updated to v0.7.7 (a minor update)

Some bugs were fixed too:

  • The track management page in the WP admin gained a lot of speed through some indexes on Trackserver’s database tables.
  • Fixed a bug in the handling of OsmAnd’s timestamps, that caused an integer overflow on 32-bit systems.

Under the hood, there were some changes too.

Trackserver is now capable of using GeoJSON, rather than Polyline encoding, for getting tracks from the server to display them on a map. However, the benefit of this is somewhat limited. GeoJSON is human-readable (sort-of) but it is also a multitude bigger than Polyline, so for performance reasons, the default is still Polyline.

Trackserver has always tried to determine whether its JavaScript files (including those belonging to Leaflet and its plugins) are necessary on the current page, and to not load them if they are not. It appeared that there are quite a few possible ways in which this detection mechanism could fail, and maps could not be displayed even though they should. Version 2.0 has two ways to mitigate this problem.

First, there is the new [tsscripts] shortcode, that forces Trackserver to load its scripts and CSS, even though the [tsmap] shortcode is not detected. Use this if all else fails. Second, there is an alternative detection algorithm, that can detect the use of the [tsmap] shortcode much more reliably (should be 100%) but has the disadvantage that Trackserver’s CSS cannot be loaded in the <head> of the HTML document anymore. So, neither solution is perfect and that’s why they’re both there.

The technical background story to this problem is, that some WordPress plugins and themes use custom WP_Query objects. This means that the actual list of posts to be displayed can be totally different than what WordPress initally thinks it should be. The initial shortcode detection can only look at the initial query, so any changes that add or remove posts from the query will surely confuse the detection algorithm. The alternative detection just uses the actual shortcode handler to initiate the inclusion of Trackserver’s JavaScript and CSS, but since this handler runs during the rendering of the page, long after the <head> section is printed, the CSS is loaded very late in the document. I am not sure whether this is a big problem, but opinions seem to differ on the subject, and loading CSS in the <head> is still best practice, so Trackserver will try to do that whenever possible.

Please test Trackserver v2.0. If you find any problems, please open a support ticket on the plugin page, or open an issue on Github.

And here’s a map for you 🙂

Fast & frequent incremental ZFS backups with zrep

Recently, I replaced one of the Windows fileservers at $dayjob with a Debian-based Samba server. For the data storage, I chose ZFS on Linux. I have been running ZFS on Linux on my backup servers for a while now, and it seems that with the latest release (0.6.4.1, dated April 23 2015), most, if not all of the stability problems I had with earlier versions are gone.

ZFS backups

ZFS has a few features that make it really easy to back up efficiently and fast:

  1. Cheap snapshots.
  2. ZFS send / receive.

ZFS snapshots are cheap in that they don’t cost any performance. ZFS is a copy-on-write filesystem, which means that every block that needs changing, is first copied to a new block, and only after the update succeeds, the reference in the filesystem is updated to the new block. The old block is then freed, unless it is part of a snapshot, in which case the data is simply left intact. You can make many snapshots of a single ZFS filesystem (theoretically 264 in a storage pool) without any cost other than the disk space they consume, which is equal to the growth of your data (or rather: accumulated size of all changes) since the oldest snapshot.

ZFS allows you to take a shapshot and send it to another location as a byte stream with the zfs send command. The byte stream is sent to standard output, so you can do with it what you like: redirect it to a file, or pipe it through another process, for example ssh. On the other side of the pipe, the zfs receive command can take the byte stream and rebuild the ZFS snapshot. zfs send can also send incremental changes. If you have multiple snapshots, you can specify two snapshots and zfs send can send all snapshots inbetween as a single byte stream.

So basically, creating a fast incremental backup of a ZFS filesystem consists of the following steps:

  1. Create a new snapshot of the filesystem.
  2. Determine the last snapshot that was sent to the backup server.
  3. Send all snapshots, from the snapshot found in step 2 up to the new snapshot created in step 1, to the backup server, using SSH:
zfs send -I <old snapshot> <new snapshot> | ssh <backupserver> zfs receive <filesystem>

Of course, on the backup server you can leverage some of the other great features of ZFS: compression and deduplication.

Enter zrep.

Zrep

Zrep is a shell script (written in Ksh) that was originally designed as a solution for asynchronous (but continuous) replication of file systems for the purpose of high availability (using a push mechanism). It was later expanded with the possibility to create backups of a filesystem using a pull mechanism, meaning the replication is initiated from the backup server and no SSH access is needed to the backup server, as it would be with push-replication.

Zrep is quite simple to use and it has good documentation, although setting it up for use as a backup solution took me a few attempts to get right. I won’t go into the gory details here, but I’ll describe my setup.

It basically works like this:

  • Zrep needs to be installed on both sides.
  • The root user on the backup server needs to be able to ssh to the fileserver as root. This has security implications, see below.
  • A cron job on the backup server periodically calls zrep refresh. Currently, I run two backups hourly during office hours and another two during the night.
  • Zrep sets up an SSH connection to the file server and, after some sanity checking and proper locking, calls zfs send on the file server, piping the output through zfs receive:
ssh <fileserver> zfs send -I <old snapshot> <new snapshot> | zfs receive <filesystem>
  • Snapshots on the fileserver need not be kept for a long time, so we remove all but the last few snapshot in an hourly cron job (see below).
  • Snapshots on the backup server are expired and removed according to a certain retention schedule (see below).

SSH access and security

Since all ZFS operations, like making snapshots and using send / receive require root privileges (at least on Linux by default; other OSs like Solaris are more flexible in this, and even Linux may allow you to chown/chmod /dev/zfs to delegate these privileges – see this issue on Github for more information) , zrep must also run as root on both ends. This means that root needs SSH access to the fileserver, which could be a huge security problem. What I usually do to mitigate this as much as possible, is:

  1. SSH access is firewalled and only allowed from IPs that need to have access. Between datacenters, I use VPNs and externally routeable IP adresses generally do not have SSH access.
  2. PasswordAuthentication no
  3. PermitRootLogin forced-commands-only
  4. Use an SSH keypair specific to this application, and configure an entry for the fileserver in /root/.ssh/config on the backup server, using this key.
  5. Use a wrapper script for zrep and specify this as a forced command in root’s authorized_keys.
  6. Use a list of ‘from’ IPs (containing only your backup server(s)) for this specific key in root’s authorized_keys to restrict access even beyond the firewall.

The wrapper script can check the command it gets from the client and only exec the original command if nothing smells fishy.

I guess it would also be possible to use sudo, instead of granting root SSH access, but I haven’t tested this. If you would like to try it out: zrep allows for specifying the path to the zrep executable on the remote end using an environment variable (ZREP_PATH), so maybe it’s as easy as calling:

ZREP_PATH="sudo zrep" zrep refresh <pool/fs>

Since zrep on the backup server would still run as root, you would need to configure the user account to use in the SSH connection in /root/.ssh/config. For example:

Host myfileserver
    User zrep
    IdentityFile /root/.ssh/id_rsa_zrep

And of course you would need to configure sudo on the fileserver to allow the user of choice to execute zrep (or the wrapper script) as the root user without specifying a password. Let me know if it works, when you give it a try.

Backup retention / expiration

When using the ‘refresh‘ command, zrep does not automatically expire old snapshots like it does when using the more standard ‘sync’ replication features, so we have to trigger snapshot expiration by hand. Zrep keeps track of the snapshots that it makes and ships to the backup server by recording the timestamps in ZFS custom properties. It also provides an expire command, that lets you clean up old snapshots, but it is very rudimentary. It only allows you to specify a number of snapshots to keep (5 by default, but this value is changeable for local and remote snapshots independently) and if you call zrep expire, it just deletes all but the last 5 snapshots. This is fine for the fileserver itself, so we run an hourly cronjob, just telling zrep to expire all but the last 5 snapshots. The -L flag tells zrep to leave any remote (replicated) snapshots alone:

17 *    * * *   root    /usr/local/bin/zrep expire -L >/dev/null

On the backup server however, I would like a more sophisticated rentention schedule. We make snapshots frequently and even though there is no real technical benefit to cleaning them up, I don’t really want to keep all of them around. I’d like to retain backups to a more traditional schedule, like:

  • every snapshot for the past 48 hours
  • one backup daily for 15 days
  • one weekly backup for 4 weeks
  • one backup monthly for 6 months
  • a yearly snapshot for a couple of years

For this, we use a Python script called zrep-expire (Github). Zrep-expire looks at the creation time of a snapshot and checks it against an expiration rule. If, according to the rule, the snapshot is expired, it destroys the snapshot. The crontab entry looks like this:

55 6 * * * /usr/local/bin/zrep-expire -c /etc/zfs/zrep-expire.conf

Listing and restoring backups

A list of all snapshots with the most interesting properties can be viewed with:

/sbin/zfs list -t snapshot -o name,zrep:sent,creation,refer,used

ZFS on Linux, like Oracle Solaris ZFS, exposes snapshots in a .zfs/snapshot directory in the root of the filesystem. Please note that the .zfs directory is hidden and you will not see it even with ls -a. Each snapshot has an entry with its name in .zfs/snapshot, and the root user can cd into those subdirectories and copy files from there to their original location, or anywhere s/he wants. Remember that snapshots are read-only, so you cannot change any data there.


Thanks to Philip Brown, the author of Zrep, for some useful feedback on this post.

1 2 3 12