Tag : gps

Introducing Trackserver WordPress plugin

A while ago, I wrote a post titled “Self-hosted live online GPS tracking with Android“, in which I evaluated a few Android apps that can be used for, you guessed it, live online location tracking. The idea is, that you have your phone periodicially send your location to a web service while you’re on the go. The web service stores the location updates and optionally publishes them on a map.

While there are some apps that do this, there aren’t many (free) options for hosting your own server. That’s why I decided to write my own, and do it as a free and open source WordPress plugin, to make it as accessible as possible. Please meet Trackserver.

Trackserver is designed to work with TrackMe and OruxMaps. OsmAnd support is on the roadmap and I’m thinking about adding GpsGate support. All of these apps offer the possibility to periodically post location updates to a web URL that you can specify. Your own WordPress blog with the Trackserver plugin can ‘listen’ on such a URL to receive the updates and store them in a database. The plugin also offers a WordPress shortcode to include maps with your GPS tracks in your posts and pages, using the fantastic Leaflet library. Collecting and publishing your tracks has never been easier, at least not in a self-hosted website!

A short list of Trackserver’s features:

  • Collect location updates using several mobile apps
  • Publish your collected tracks on a map in your posts and pages
  • Upload tracks via an upload form in the WordPress admin backend
  • Upload tracks by sharing a GPX file from your mobile, using a sharing app like Autoshare
  • View, edit, delete and merge your tracks in the WordPress admin backend
  • Live tracking of your location, with automatic updates of the map view in your WordPress post
  • Full-screen map views

Trackserver’s WordPress admin allows you to upload GPX files to add new tracks, view, delete and merge tracks and edit their properties (name, comment, etc.). Please take a look at the plugin page at wordpress.org or the source code repository at Github. Both pages have more information on Trackserver’s features. The current version is 1.0, which has all the basic features described above.

Getting started with Trackserver is quite easy:

  1. Install the plugin in your WordPress site
  2. Install TrackeMe and/or OruxMaps on your Android phone
  3. Configure the app(s) with your WordPress URL, username and password (HowTo with screenshots is included in the plugin)
  4. Start tracking!

Feel free to give it a go, and if you do, let me know what you think!


Self-hosted live online GPS tracking with Android

Since long I have been interested in live online location tracking using my Android phone and I have been using a collection of software components that makes this possible for a while. The other day, I was discussing the subject with a friend who is looking for a similar solution and has been using OruxMaps for offline tracking. I was unfamiliar with OruxMaps, but it has a zillion features and it looks great in general. It triggered me to do a short survey of the Android landscape, since it appears that more apps have popped up since I last looked.

The solutions I am interested in should be able to do live online tracking to a self-hosted location, meaning the Android app should offer the possibility to enter a custom hostname or URL. Hosted services, like the once popular but now deceased Google Latitude or InstaMapper are not interesting to me. My location data is mine and no one else’s, and I would like to decide how I consume the data and if/how I share my location. This post is categorized in ‘Nerd Stuff‘ for a reason 🙂

So I am looking for:

  • a Android app,
  • open source, if possible,
  • with support for a self-hosted server,
  • AND a matching a server component that can put the location data in a database,
  • OR an open protocol specification or a protocol that is easy to reverse-engineer, so I can build the server component myself.


TrackMe

Reviewed version: 1.11.1 (October 2014)TrackMe

TrackMe is available for Windows Phone as well as Android. I have been using it for quite a while. It is robust and offers some interesting features beyond tracking. It also offers a server component written in PHP, which uses a MySQL database for storage. TrackMe is ad-supported, but ads can be removed for €2.24. It supports offline as well as online tracking.

The strong points of TrackMe are:

  • Online tracking when possible (working internet connection), offline tracking and uploading when possible, manually or automatically. It just works.
  • Location updates are grouped in trips.
  • Extensive configuration options, allowing for trade-off decisions between accuracy and battery use.
  • It can be configured to start tracking as soon as the app starts or even when your phone boots.
  • Server component ready to go, using PHP/MySQL. It has a web front-end that plots tracks on a Google Map.
  • Remote control of the app (start/stop tracking, report current location) via SMS
  • Hackable: the online tracking protocol is simple HTTP GET requests, writing your own server is easy.

The drawbacks:

  • Not open source, ad supported, user must dismiss a pop-up offering ad-removal every time the app starts.
  • The Android app does not have a map view, it only displays an activity log.
  • PHP server code is of bad quality and mostly written in 2008. Latest modifications in 2012. Only MySQL is supported as a backend.
  • PHP web front-end uses Google Maps. I prefer OpenStreetMap.
  • I couldn’t get HTTPS to work in the app (‘SSLPeerUnverifiedException: No peer certificate’, even though the server’s SSL certificate is fine).
  • Android app is pretty ugly.
  • Development of the app is really slow.

The bottom line: TrackMe as an Android app would have everything I wanted in a tracking app, if it were a little prettier, if SSL worked and if it were completely free. A map view within the app would be nice, but I can live without it. The PHP server works and the web interface looks alright, but the code is an unmaintainable pile of crap.

Home page: http://www.luisespinosa.com/trackme_eng.html

Play store: https://play.google.com/store/apps/details?id=LEM.TrackMe

OruxMaps

Reviewed version: 6.0.4 (December 2014)Orux Maps

Like I said, I never heard of OruxMaps before yesterday, which is a real shame, because it is the most versatile mapping app I have seen so far. Version 1.0 was released in 2009, so it’s not exactly a new kid on the block either. OruxMaps is free to use and free of ads, but not open source as far as I can tell. OruxMaps is a map-viewer and track-logger with many features, its tagline is “Travel & sport companion“. Just to name a few features that I find most useful:

  • it supports both online and offline maps (in a variety of formats)
  • it can do offline tracking and export to several file formats
  • it can upload tracks to many different services like EveryTrail and ikiMap (many Spanish services, due to the app’s Spanish origin)
  • it can do live online tracking via Map My Tracks, GpsGate and OkMap
  • it supports routes and waypoints, with photos and videos
  • it supports all sorts of external devices, like GPS receivers, ANT+ devices, bluetooth heart rate monitors and so on

and the list goes on and on. This app clearly gets a lot of love from its developer(s?), and I really like that a lot of attention is given to the looks of the app. The icons, the layout of the screen, the menus, even the logo… the whole user experience is excellent, and it seems like every little detail is customizable.

So, I guess I’ll write another post about OruxMaps later, but right now, I’ll focus on the live online tracking features.

Like I said above, live online tracking is supported via 3 different methods, all of which have the option of a self-hosted server solution. The most important one, from Orux’s point of view, is Map My Tracks. This is a service, focused on tracking outdoor activities. It has an open, documented API and OruxMaps offers a setting to override the ‘live tracking’ URL. This makes it possible to implement your own server. Communication takes place over HTTP POST. Map My Tracks uses ‘activities’ to separate tracks, so I think everything we need is here, even though there seem to be some unresolved bugs.

Another interesting option is Orux Maps’ GpsGate support. GpsGate is a commercial product, but the server is free to use up to 5 users. The server runs on Windows, so it may or may not be for you (it’s not for me ;-)), but the GpsGate Server Protocol v2.0 is documented, so implementing a simple server of your own should be a viable option. However, my impression is that the GpsGate support is not widely used in the OruxMaps community, so I can’t say how well it works.

And finally, there’s the OkMap client. OkMap is a Windows desktop application and apparently (I have not tested this in any way), it can listen on a port to which live location updates can be sent. I haven’t found any reference material regarding the used protocol, but I’m pretty sure it isn’t HTTP. Reverse-engineering the protocol and implementing your own server may be a challenge, and with the options of Map My Tracks and GpsGate being there, I don’t see any reason to try.

To me, it seems that Map My Tracks is the easiest choice here, if you were to create your own protocol implementation. I did do a quick search for any Map My Tracks servers that may already be out there, but I didn’t find any.

Home page: http://www.oruxmaps.com/

Play store: https://play.google.com/store/apps/details?id=com.orux.oruxmaps 

OwnTracks

OwnTracksReviewed version: March 2014

OwnTracks (formerly MQTTitude) is a set of open source tools, among which an Android app and one for iOS. The project was started when (and because) Google Latitude was discontinued. Its main purpose is to keep track of your and your friends’ location by showing their picture or a marker on the map. As such, it does not have a notion of ‘trips’ or something like that and location updates are generally infrequent (> 1 minute intervals). Even though the wiki mentions something called ‘Move mode’, which is supposedly meant for actual movement tracking, this feature is not available in the Android app at the time of writing. OwnTracks is designed to be ‘always on’ and cannot be stopped from within the app. All in all, OwnTracks is not really suitable (or meant) as a travel companion.

Another thing that makes OwnTracks a bit of an outsider (but all the more interesting, one might argue), is the fact that it uses MQTT rather than HTTP for communication. This choice was made because MQTT is a really great fit for messages like location updates and it supposedly has great benefits for your phone’s battery life. To use OwnTracks, you need an MQTT broker like Mosquitto. You could also use a public broker, but that kind of defeats the purpose of choosing a self-hosted solution (privacy). Mosquitto is not difficult to set  up, but you would need a place to run it and a standard shared hosting account probably won’t cut it.

Mosquitto is merely a message broker and doesn’t store anything by itself. For that purpose, OwnTracks has a backend script (m2s) that subscribes to the topics that the app publishes to, and stores the updates in a database.

Home page: http://owntracks.org/

Play store: https://play.google.com/store/apps/details?id=st.alr.mqttitude

OsmAnd

Reviewed version: 1.9.4 (December 2014)OsmAnd
OsmAnd is a different beast, because tracking is not its core competence. OsmAnd is a maps and navigation app, that supports offline maps. The reason to list it here is that it can be used for live online tracking, and since you may already use it for navigation, you might as well use it for tracking.

OsmAnd supports tracking through custom web services. Once the tracking functionality is enabled through the plugin manager, a URL can be set and the location is logged on a configurable interval using a simple HTTP GET. HTTPS does not seem to work; my server did not receive any updates when using a HTTPS URL, but no errors were reported in the app. Once the tracking settings are in order, you can start tracking (both offline and online) with a single tap on the screen. OsmAnd using a custom web URL does not use the concept of trips or something like that, it just sends location updates without any context.

Some notes:

  • Tracking settings can be set in 3 different profiles, depending on the type of transport (car / bike / foot).
  • Local (offline) tracking interval can be set independently from online tracking interval, so you could for example send infrequent online updates, while still keeping a detailed local log.
  • OsmAnd also supports OsMo, a Russian service linked to the open source OsMoDroid GPS tracker for Android (Github), but I did not test that.

Home page: http://osmand.net/

Play store: https://play.google.com/store/apps/details?id=net.osmand


Other solutions

Even though there are plenty of GPS trackers on the market these days, many of which support some kind of export to online services, or even live updates, only very few have the option of a self-hosted server. I guess one of the reasons is, that most apps that support live updates are designed for a specific service (examples: Glympse, InstaMapper, LocaToWeb, guibber), where monetizing the users is the main goal. Having an open API or supporting self-hosted solutions is not in their interest. As a matter of fact, I haven’t been able to find any other solution in addition to the ones discussed above.

UPDATE 10 february 2015:

The other day, I found Gps Tracker for WordPress, which combines a WordPress plugin and an Android app to do more or less what I am trying to achieve here, except it focusses on tracking of multiple people/devices in a single map view. The Android app seems to send at most one location update per minute, and as such it’s not very suitable for sports and activity tracking. The map view in the WordPress plugin also doesn’t really draw a track (line), but merely a collection of waypoints that form the location history of the person/device you’re tracking. This app is best compared to Owntracks (reviewed above), because its goals seem similar.

(end update)

There is just one more possibility I can think of, but it’s not very practical and it requires a rooted phone. Just follow this five-step program:

  1. take one of the apps that uses a hosted service for live tracking
  2. find out the hostname / URL to which live updates are posted
  3. divert the hostname of the service to your own server via /etc/hosts (requires root on Android)
  4. reverse-engineer the protocol
  5. enjoy!

If you have other ideas, or apps to add to this page, please please please let me know!

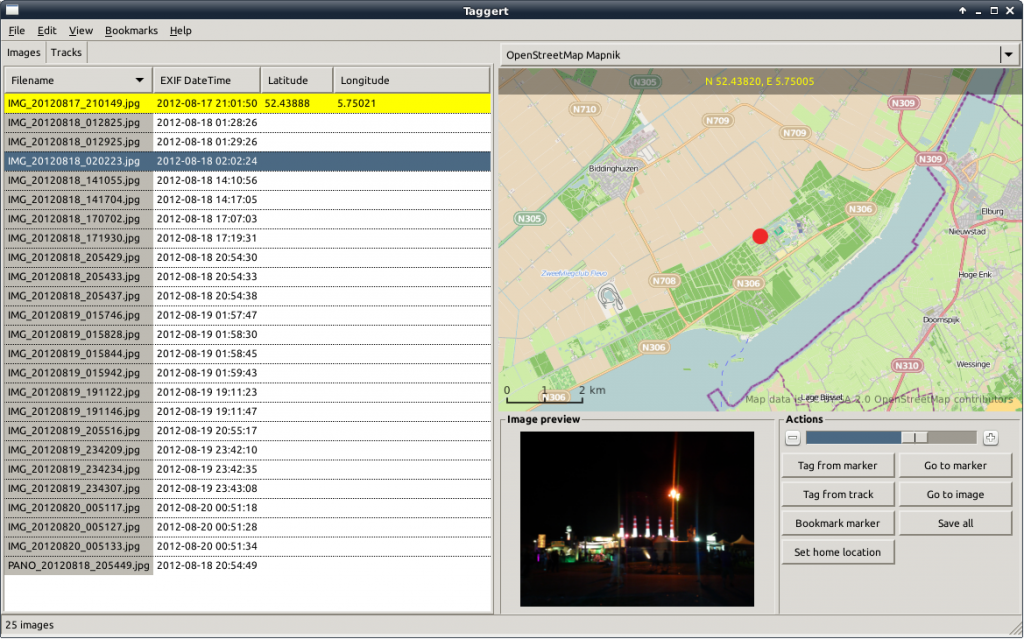
Introducing “Taggert”, a GTK+3 geotagging application

Up to now, I have been geotagging my pictures with gpsPhoto.pl, a command-line tool, that matches coordinates from GPX files with the timestamps on images. This works nicely, but it requires that you indeed have a GPX track from the time the picture was taken. For some time, I have been looking for a tool that allows me to do manual geotagging using a map.

I have found several tools that offer this functionality, or part of it. As a matter of fact, there are quite a few tools available for Windows, but I need one that runs on Linux, so I will not discuss those here. First, I found Geotag, a Java application, but it does not offer a map, so it isn’t very convenient. What I was looking for should look a lot like locr GPS Photo for Windows. This is, as the name suggests, a Windows-only tool.

Finally, I found GottenGeography, a GTK+ tool, written in Python, that does almost everything I want. Almost.

When I found GottenGeography, I had already started to explore the possibilities of writing a tool of my own, and the basis for Taggert was already there. After playing around with GottenGeography for a while, I decided I don’t like some of its design choices, and because creating a GTK+ application in Python seemed like a nice challenge, I decided to continue. And here it is: Taggert v1.0.

The README on Github explains what Taggert is, what it aims to be and how to try it out.

In short: Taggert allows add, change and remove geotags on your pictures, either manually using a marker on a map, or automatically using one of more GPX files containing GPS tracks. It allows you to store bookmarks for frequently-used locations and it supports multiple map sources, like OpenStreetMap and MapQuest.

In the near future, I hope to provide packages for different Linux distributions (at least Debian and Ubuntu). For now, you can download it from Github.

Convert tracks into routes with GPSBabel

Last week, I blogged about creating routes for a Garmin Zümo, using Google Maps and GPSBabel. The main problem that I was trying to solve, is how to create a “real” route that my Zümo will understand, built out of a minimal amount of route waypoints (that show up as such on the Zümo when navigating), rather than possibly thousands of trackpoints, that are hard to process for the device and don’t give you as much navigation flexibility.

This post is about something else, namely how to convert a GPS track (that you created by driving, downloaded somewhere, etc.) into a route, with the same criteria as last time.

Suppose you have a GPX file, containing a track. Typically, such a track contains many trackpoints. For example, a drive of about 60 km that I took a few weeks back, gave me a track consisting of over 2600 trackpoints. Now, I would like to create a route out of this track, that I can share with others.

I don’t know about you, but in my case, a track always contains some stuff that I don’t want to show up in the end result: mistakes that I made during my ride, like entering dead-end streets, or those extra meters that you make, looking for a place to park for a coffee break. Stuff like that is easily corrected with Viking, a nice GPS/track/waypoint editor, that runs on Linux (POSIX) and Windows, and is available under the GPL v2 license. Maybe later I will post something on using Viking, but that’s besides the scope of this post. Let me continue.

So, now I have a GPX, containing the exact track that I want turned into a route. We will use GPSBabel to do the conversion. The invocation is similar to the one in my previous post, but instead of using waypoints, we convert a track into a route, and we add a filter: simplify. I quote:

The Simplify filter is used to simplify routes and tracks for use with formats that limit the number of points they can contain or just to reduce the complexity of a route.

And that is exactly what we need. Simplify will let you specify a maximum number of waypoints in a route, but we will use another feature: maximum error. It allows us (and again, I quote) to specify the maximum allowable error that may be introduced by removing a single point. That means that the nuber of waypoints can be higher on more complex pieces of our route, and lower on the long stretches.

Here we go:

gpsbabel -i gpx -o gpx -f track.gpx -x transform,rte=trk -x nuketypes,waypoints,tracks -x simplify,error=0.1k -F route.gpx

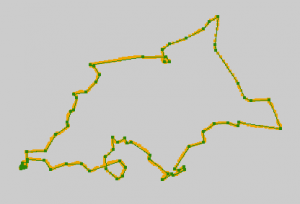
By specifying a maximum error of 0.1k (0.1 km, or 100 m), our original track file, containing a track of 62.84 km in 2641 trackpoints, is converted in to a route file, containing 73 route waypoints.

In the picture, you can see the result. Click to enlarge. In orange is the original track; in green is the resulting route, with dots on the route waypoints. The map is left out for clarity.

I think that this gives us a route, that has enough waypoints not to leave much room for interpretation by the routing engine of a GPS device. My guess is, that most routing engines will calculate identical routes, regardless of your routing parameters, like shortest/quickest route. I haven’t tested this, though.

It speaks for itself, that a higher value for ‘error’ will give you less waypoints, and a lower value will give you more. For example, using ‘error=0.05k’ (50 m), gives me 109 route waypoints. If this is still acceptable, you can profit from the greater accuracy of your route.

Google maps

Now, the funny thing is, that this can also be applied to tracks from Google Maps’ KML files. Please have a look at this post. So if you want to skip the labour-intensive step of creating placemarks for all your route waypoints, you can use the track instead.

The GPSBabel invocation becomes:

gpsbabel -i kml -o gpx -f Routetest.kml -x transform,rte=trk -x nuketypes,waypoints,tracks -x simplify,error=0.5k -F Routetest.gpx

Meaning:

  • Convert KML into GPX
  • Convert the track into a route
  • Remove as many waypoints as possible, creating maximum error of 500 meters
  • Remove tracks and waypoints from the resulting GPX, keeping only the route

With the KML file from my example (a route of some 590 km through some of the best parts of France), this will result in a route, made out of 179 route waypoints, which should be fine for a Garmin Zümo.

Drawback

There is one drawback when using the track from Google as input for a route for -for example- a Garmin device. The waypoints that remain after the conversion are the result of a mathematical algorithm, and their position on the map is absolute. This means, that if there are differences between Google’s map and Garmin’s (and there are!), it can happen, that a route waypoint ends up in an unfortunate location. For example, the waypoint could end up on the other side of the highway, where traffic drives in the opposite direction.

Since the remaining waypoints will be concentrated around crossroads and curves, it is in fact quite likely that at least a few of these problems will occur.

The route on the Garmin might end up with strange loops as a result. Therefore, it is pretty essential to check the final result, either in MapSource or on your GPS device, to prevent unpleasant surprises.

Garmin Zümo, Google Maps, GPSBabel

Tonight, I was looking for the best way to create a route in Google Maps and import it on my Garmin Zümo. I have found an easy way, which does not give the best results, and a way that’s a little more difficult, but will get you more or less exactly what you want. If you want to do this, you need GPSBabel.

First, you need to understand that a Garmin Zümo, and probably other Garmin devices, have a concept called “route waypoints”, which are not waypoints in the regular sense (“favorites” in Zümo-speak), but are the waypoints that a route is made up of.

The objective is, to get a route that is a “real” route in Garmin sense, meaning that it is composed of no more waypoints than necessary, all of which appear on the route as “route waypoints” (orange flags on a Zümo). This is good, because the device will always navigate to the next route waypoint, which is convenient when you have to recalculate the route underway.

The easiest way is to just create your route in Google Maps (you know, draw a line that sticks to roads and drag it around to make it suit your needs until you are done), save it to My Maps and download it as KML. Then you can use GPSBabel to convert it to GPX, which you can copy to the Garmin device:

gpsbabel -w -i kml -o gpx -f route.kml -F route.gpx

By doing this, you have to rely on the feature that allows the Zümo to convert a track into a route. So, if you didn’t know: you can import a recorded track from any source into your Zümo, and the Zümo will calculate it into a route. This approach gives you a route that matches exactly what you prepared, but has two major drawbacks:

  • Tracks are made up of many (possibly thousands) of waypoints. Having the Zümo convert this into a route takes a long time, and there is a big risk that the Zümo will not have enough memory to process the whole track, which leaves you with an incomplete route. Rendering this type of route on the map is also slower, although that may be just my impression.
  • The resulting route does not have any “route waypoints”, as discussed above. It will just have a start and finish. When you drive the route, and underway you have to recalculate the route (roadblocks, detours, you missed an exit, stuff like that), it will then calculate route directly to the finish according to the device’s route settings. Any modifications you made by hand in Google are now lost. You can get them back by reloading the route from the menu, but it’s up to you to find your way back to it.

There is another way, which does give you a route with route waypoints, it’s just a little more work.

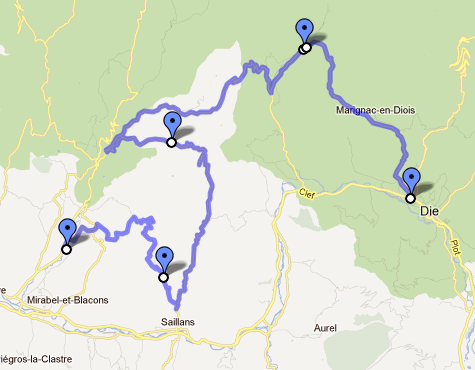
When you drag your route in Google Maps to a diffent road, Google marks that point with a small white dot with a black border. These are our route waypoints. Create as many as you need, but not too many because of the next step.

When your route is finished, create a placemark on every route waypoint that you added. Placemarks are to Google what waypoints (the regular kind) or favorites are to Garmin. If you have a highly customized route, this can be some work. Sorry about that. Make sure that the order in which the placemarks appear in the list on the left hand side of the screen match the order in which they appear in the route. Also make sure that you do not have any placemarks that are not part of your route.

When you are done, download the route as KML. We will now use GPSBabel to construct a route from the placemarks in the KML file.

gpsbabel -i kml -o gpx -f route.kml -x transform,rte=wpt -x nuketypes,waypoints,tracks -F route.gpx

This does a couple of things:

  • Convert KML into GPX
  • Using the transform filter, create a route from all waypoints (placemarks)
  • Discard all waypoints and tracks, using the nuketypes filter

The last step is there to make sure that the Zümo will not try to import all the route waypoints as regular waypoints (so they show up in your Favorites), and we don’t need the track either. If you want to keep the track, for example to compare the results, you can leave out the tracks option from the nuketypes filter.

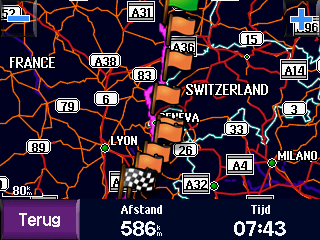
So, an example. First click here to open my example in Google maps. And here’s how the final result looks on the Zümo:

Google  thinks this route is 593 km, the Zümo thinks it’s 586 km. That sounds about right, doesn’t it?

Just one more thing to keep in mind: Google’s routing engine is different from the Zümo’s, and your Zümo also takes your settings into account when calculating, like whether to get the quickest or the shortest route, which types of roads to avoid, etc. If you want the result on the Zümo to closely match what you created in Google, make sure you have enough waypoints. The more waypoints you have, the closer they are to each other, and the fewer possible roads there are to get from one waypoint to the next. It’s as simple as that 🙂