Category : Nerd Stuff

Introducing Trackserver WordPress plugin

A while ago, I wrote a post titled “Self-hosted live online GPS tracking with Android“, in which I evaluated a few Android apps that can be used for, you guessed it, live online location tracking. The idea is, that you have your phone periodicially send your location to a web service while you’re on the go. The web service stores the location updates and optionally publishes them on a map.

While there are some apps that do this, there aren’t many (free) options for hosting your own server. That’s why I decided to write my own, and do it as a free and open source WordPress plugin, to make it as accessible as possible. Please meet Trackserver.

Trackserver is designed to work with TrackMe and OruxMaps. OsmAnd support is on the roadmap and I’m thinking about adding GpsGate support. All of these apps offer the possibility to periodically post location updates to a web URL that you can specify. Your own WordPress blog with the Trackserver plugin can ‘listen’ on such a URL to receive the updates and store them in a database. The plugin also offers a WordPress shortcode to include maps with your GPS tracks in your posts and pages, using the fantastic Leaflet library. Collecting and publishing your tracks has never been easier, at least not in a self-hosted website!

A short list of Trackserver’s features:

  • Collect location updates using several mobile apps
  • Publish your collected tracks on a map in your posts and pages
  • Upload tracks via an upload form in the WordPress admin backend
  • Upload tracks by sharing a GPX file from your mobile, using a sharing app like Autoshare
  • View, edit, delete and merge your tracks in the WordPress admin backend
  • Live tracking of your location, with automatic updates of the map view in your WordPress post
  • Full-screen map views

Trackserver’s WordPress admin allows you to upload GPX files to add new tracks, view, delete and merge tracks and edit their properties (name, comment, etc.). Please take a look at the plugin page at wordpress.org or the source code repository at Github. Both pages have more information on Trackserver’s features. The current version is 1.0, which has all the basic features described above.

Getting started with Trackserver is quite easy:

  1. Install the plugin in your WordPress site
  2. Install TrackeMe and/or OruxMaps on your Android phone
  3. Configure the app(s) with your WordPress URL, username and password (HowTo with screenshots is included in the plugin)
  4. Start tracking!

Feel free to give it a go, and if you do, let me know what you think!


First time at FOSDEM

Last Saturday, I went to FOSDEM for the first time and I though I’d write a little post about my general findings.FOSDEM

I attended about 7 talks in 5 different tracks. Contentwise, most talks were interesting enough and most speakers I have seen did a decent job on their presentation. Some weren’t quite the masters of the English language you would hope for, and some really need to improve on their time-management (*), but on average it wasn’t bad.

(*) I attended one talk where the speaker started with an introduction of the product he was talking about, before starting on the actual subject of the talk, but due to taking questions from the audience, he only had 5 minutes left after the introduction and he ended up skipping more than half his slides. Since I was already familiar with the product, I learnt nothing new and the whole talk was sort of a waste of time 🙁

There were some things that really bothered me though:

  • The venue has some really old buildings and classrooms, that are noisy as hell. Squeeking and loudly banging doors, and tables being (un)folded were quite distracting. As a matter of fact, I find it hard to imagine that students actually take classes in an environment like that.
  • With almost all the talks I went to, the room was filled to the last chair, giving the impression that bigger rooms are needed.
  • People can walk in and out of talks whenever they like, causing distractions, mostly due to the noise.
  • Talks are scheduled without breaks inbetween, so in the last 5 minutes of a talk (usually the Q&A section) groups of people come barging into the room for the next talk. They can’t sit anywhere, because the room is full, but people wanting to leave the room after the talk now can’t because there are people standing everywhere.

So, in short, I was pleased with the schedule, but on the practical side, I see a lot of room for improvement. I understand that some things are hard to fix, but I would definitely recommend scheduling time between talks and getting people to guard the doors to make sure a talk is finished and people can get out before letting the next crowd in.

In general, FOSDEM is a nice conference to visit. Good talks, and many renowned people from the Open Source community are there (I even saw RMS handing out flyers outside) and they’re available for questions and discussions, which is really great. No entrance fee or registration is required, which makes it very accessible (but it won’t stop me from complaining 😉 ).

FOSDEM has a lot in common with T-DOSE, which is much smaller, but also a great conference.


Self-hosted live online GPS tracking with Android

Since long I have been interested in live online location tracking using my Android phone and I have been using a collection of software components that makes this possible for a while. The other day, I was discussing the subject with a friend who is looking for a similar solution and has been using OruxMaps for offline tracking. I was unfamiliar with OruxMaps, but it has a zillion features and it looks great in general. It triggered me to do a short survey of the Android landscape, since it appears that more apps have popped up since I last looked.

The solutions I am interested in should be able to do live online tracking to a self-hosted location, meaning the Android app should offer the possibility to enter a custom hostname or URL. Hosted services, like the once popular but now deceased Google Latitude or InstaMapper are not interesting to me. My location data is mine and no one else’s, and I would like to decide how I consume the data and if/how I share my location. This post is categorized in ‘Nerd Stuff‘ for a reason 🙂

So I am looking for:

  • a Android app,
  • open source, if possible,
  • with support for a self-hosted server,
  • AND a matching a server component that can put the location data in a database,
  • OR an open protocol specification or a protocol that is easy to reverse-engineer, so I can build the server component myself.


TrackMe

Reviewed version: 1.11.1 (October 2014)TrackMe

TrackMe is available for Windows Phone as well as Android. I have been using it for quite a while. It is robust and offers some interesting features beyond tracking. It also offers a server component written in PHP, which uses a MySQL database for storage. TrackMe is ad-supported, but ads can be removed for €2.24. It supports offline as well as online tracking.

The strong points of TrackMe are:

  • Online tracking when possible (working internet connection), offline tracking and uploading when possible, manually or automatically. It just works.
  • Location updates are grouped in trips.
  • Extensive configuration options, allowing for trade-off decisions between accuracy and battery use.
  • It can be configured to start tracking as soon as the app starts or even when your phone boots.
  • Server component ready to go, using PHP/MySQL. It has a web front-end that plots tracks on a Google Map.
  • Remote control of the app (start/stop tracking, report current location) via SMS
  • Hackable: the online tracking protocol is simple HTTP GET requests, writing your own server is easy.

The drawbacks:

  • Not open source, ad supported, user must dismiss a pop-up offering ad-removal every time the app starts.
  • The Android app does not have a map view, it only displays an activity log.
  • PHP server code is of bad quality and mostly written in 2008. Latest modifications in 2012. Only MySQL is supported as a backend.
  • PHP web front-end uses Google Maps. I prefer OpenStreetMap.
  • I couldn’t get HTTPS to work in the app (‘SSLPeerUnverifiedException: No peer certificate’, even though the server’s SSL certificate is fine).
  • Android app is pretty ugly.
  • Development of the app is really slow.

The bottom line: TrackMe as an Android app would have everything I wanted in a tracking app, if it were a little prettier, if SSL worked and if it were completely free. A map view within the app would be nice, but I can live without it. The PHP server works and the web interface looks alright, but the code is an unmaintainable pile of crap.

Home page: http://www.luisespinosa.com/trackme_eng.html

Play store: https://play.google.com/store/apps/details?id=LEM.TrackMe

OruxMaps

Reviewed version: 6.0.4 (December 2014)Orux Maps

Like I said, I never heard of OruxMaps before yesterday, which is a real shame, because it is the most versatile mapping app I have seen so far. Version 1.0 was released in 2009, so it’s not exactly a new kid on the block either. OruxMaps is free to use and free of ads, but not open source as far as I can tell. OruxMaps is a map-viewer and track-logger with many features, its tagline is “Travel & sport companion“. Just to name a few features that I find most useful:

  • it supports both online and offline maps (in a variety of formats)
  • it can do offline tracking and export to several file formats
  • it can upload tracks to many different services like EveryTrail and ikiMap (many Spanish services, due to the app’s Spanish origin)
  • it can do live online tracking via Map My Tracks, GpsGate and OkMap
  • it supports routes and waypoints, with photos and videos
  • it supports all sorts of external devices, like GPS receivers, ANT+ devices, bluetooth heart rate monitors and so on

and the list goes on and on. This app clearly gets a lot of love from its developer(s?), and I really like that a lot of attention is given to the looks of the app. The icons, the layout of the screen, the menus, even the logo… the whole user experience is excellent, and it seems like every little detail is customizable.

So, I guess I’ll write another post about OruxMaps later, but right now, I’ll focus on the live online tracking features.

Like I said above, live online tracking is supported via 3 different methods, all of which have the option of a self-hosted server solution. The most important one, from Orux’s point of view, is Map My Tracks. This is a service, focused on tracking outdoor activities. It has an open, documented API and OruxMaps offers a setting to override the ‘live tracking’ URL. This makes it possible to implement your own server. Communication takes place over HTTP POST. Map My Tracks uses ‘activities’ to separate tracks, so I think everything we need is here, even though there seem to be some unresolved bugs.

Another interesting option is Orux Maps’ GpsGate support. GpsGate is a commercial product, but the server is free to use up to 5 users. The server runs on Windows, so it may or may not be for you (it’s not for me ;-)), but the GpsGate Server Protocol v2.0 is documented, so implementing a simple server of your own should be a viable option. However, my impression is that the GpsGate support is not widely used in the OruxMaps community, so I can’t say how well it works.

And finally, there’s the OkMap client. OkMap is a Windows desktop application and apparently (I have not tested this in any way), it can listen on a port to which live location updates can be sent. I haven’t found any reference material regarding the used protocol, but I’m pretty sure it isn’t HTTP. Reverse-engineering the protocol and implementing your own server may be a challenge, and with the options of Map My Tracks and GpsGate being there, I don’t see any reason to try.

To me, it seems that Map My Tracks is the easiest choice here, if you were to create your own protocol implementation. I did do a quick search for any Map My Tracks servers that may already be out there, but I didn’t find any.

Home page: http://www.oruxmaps.com/

Play store: https://play.google.com/store/apps/details?id=com.orux.oruxmaps 

OwnTracks

OwnTracksReviewed version: March 2014

OwnTracks (formerly MQTTitude) is a set of open source tools, among which an Android app and one for iOS. The project was started when (and because) Google Latitude was discontinued. Its main purpose is to keep track of your and your friends’ location by showing their picture or a marker on the map. As such, it does not have a notion of ‘trips’ or something like that and location updates are generally infrequent (> 1 minute intervals). Even though the wiki mentions something called ‘Move mode’, which is supposedly meant for actual movement tracking, this feature is not available in the Android app at the time of writing. OwnTracks is designed to be ‘always on’ and cannot be stopped from within the app. All in all, OwnTracks is not really suitable (or meant) as a travel companion.

Another thing that makes OwnTracks a bit of an outsider (but all the more interesting, one might argue), is the fact that it uses MQTT rather than HTTP for communication. This choice was made because MQTT is a really great fit for messages like location updates and it supposedly has great benefits for your phone’s battery life. To use OwnTracks, you need an MQTT broker like Mosquitto. You could also use a public broker, but that kind of defeats the purpose of choosing a self-hosted solution (privacy). Mosquitto is not difficult to set  up, but you would need a place to run it and a standard shared hosting account probably won’t cut it.

Mosquitto is merely a message broker and doesn’t store anything by itself. For that purpose, OwnTracks has a backend script (m2s) that subscribes to the topics that the app publishes to, and stores the updates in a database.

Home page: http://owntracks.org/

Play store: https://play.google.com/store/apps/details?id=st.alr.mqttitude

OsmAnd

Reviewed version: 1.9.4 (December 2014)OsmAnd

OsmAnd is a different beast, because tracking is not its core competence. OsmAnd is a maps and navigation app, that supports offline maps. The reason to list it here is that it can be used for live online tracking, and since you may already use it for navigation, you might as well use it for tracking.

OsmAnd supports tracking through custom web services. Once the tracking functionality is enabled through the plugin manager, a URL can be set and the location is logged on a configurable interval using a simple HTTP GET. HTTPS does not seem to work; my server did not receive any updates when using a HTTPS URL, but no errors were reported in the app. Once the tracking settings are in order, you can start tracking (both offline and online) with a single tap on the screen. OsmAnd using a custom web URL does not use the concept of trips or something like that, it just sends location updates without any context.

Some notes:

  • Tracking settings can be set in 3 different profiles, depending on the type of transport (car / bike / foot).
  • Local (offline) tracking interval can be set independently from online tracking interval, so you could for example send infrequent online updates, while still keeping a detailed local log.
  • OsmAnd also supports OsMo, a Russian service linked to the open source OsMoDroid GPS tracker for Android (Github), but I did not test that.

Home page: http://osmand.net/

Play store: https://play.google.com/store/apps/details?id=net.osmand


Other solutions

Even though there are plenty of GPS trackers on the market these days, many of which support some kind of export to online services, or even live updates, only very few have the option of a self-hosted server. I guess one of the reasons is, that most apps that support live updates are designed for a specific service (examples: Glympse, InstaMapper, LocaToWeb, guibber), where monetizing the users is the main goal. Having an open API or supporting self-hosted solutions is not in their interest. As a matter of fact, I haven’t been able to find any other solution in addition to the ones discussed above.

UPDATE 10 february 2015:

The other day, I found Gps Tracker for WordPress, which combines a WordPress plugin and an Android app to do more or less what I am trying to achieve here, except it focusses on tracking of multiple people/devices in a single map view. The Android app seems to send at most one location update per minute, and as such it’s not very suitable for sports and activity tracking. The map view in the WordPress plugin also doesn’t really draw a track (line), but merely a collection of waypoints that form the location history of the person/device you’re tracking. This app is best compared to Owntracks (reviewed above), because its goals seem similar.

(end update)

There is just one more possibility I can think of, but it’s not very practical and it requires a rooted phone. Just follow this five-step program:

  1. take one of the apps that uses a hosted service for live tracking
  2. find out the hostname / URL to which live updates are posted
  3. divert the hostname of the service to your own server via /etc/hosts (requires root on Android)
  4. reverse-engineer the protocol
  5. enjoy!

If you have other ideas, or apps to add to this page, please please please let me know!

Post-processing Garmin Zumo track logs

Garmin Zumo 550

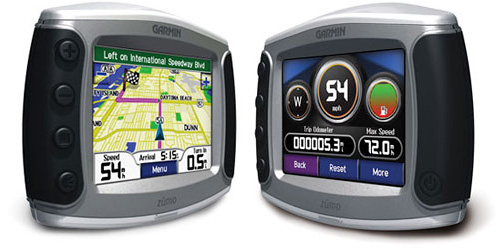
Whenever I leave the house to do something interesting (riding my motorcycle, snowboarding, hiking) I take my Garmin Zumo 550 with me, to log my tracks if not for anything else.
The great thing about a device like the Zumo is, that it always logs the GPS location, there is no need to turn that on specifically, so you can’t forget it either. So, if you like taking photographs, and you make sure you have a GPS log, you can easily tag your photos with a location, for example with my Taggert software.

Unfortunately, the Zumo suffers from some annoying bugs, that make using its track logs a little less efficient. As you can read on the linked page, the Zumo creates track archives in GPX files, but sometimes it duplicates data and sometimes it partially duplicates data. Sometimes it duplicates data across different files, but in the worst case, it happens that data is partially duplicated within the same file. This means that you end up with a GPX file, that contains two equally named tracks, one of which is complete and the other one is not. Nice, huh?

The amount of tracks in a single archive file and the timespan they were recorded in are not really predictable. I guess it mostly depends on the total number of track points in all tracks together. For my own purposes, it would be most convenient to have all tracks from a single day together in a single file. And of course, there should be no duplicate tracks and the tracks that remain should be the complete ones.

To post-process the Zumo’s track logs, I created some Python scripts. The README on Github pretty much explains what they do in detail, but in short, they do what is necessary to get what I want:

  • One file per day, containing all tracks for that day
  • Only the complete tracks are kept, (incomplete) duplicates are discarded

The scripts are written in -and tested on- Python 2.7 on Linux, but since they don’t have any external dependencies, I don’t see why they shouldn’t work on Windows or other platforms as well. They are released under the Apache 2.0 license. Please use them as you see fit.

AeroQuad build, part 3

  1. Building a quadcopter
  2. First steps with Arduino
  3. Quadcoper project rebooted
  4. AeroQuad build, part 1
  5. AeroQuad build, part 2

This is 6th post in a series about building an AeroQuad open source quadcopter, and it’s long overdue, considering that my quad has been in a flying state for almost a month.

In my last post, I summed up the things I still needed to do to get there:

  • Connect motors to ESCs
  • Add Arduino power feed to power distribution hub
  • Create extra level for mounting the flight controller on the frame

So, the 3 motor-side wires on each ESC were extended using 14AWG silicone wire. Those wires run through the carbon fibre arms of the Talon V2 frame:

The connectors on the motors and on the wires just click together, and they are isolated with shrink wrap. However, this cannot be done at this stage, because the spinning direction of the motors has yet to be determined. The motors are first wired randomly, and later, when a motor turns out to spin in the wrong direction, two of the wires have to be switched. This procedure is part of the calibration, which I am (most conveniently) not going to cover in this post.

For the extra level, I bought some more materials:

I cut a disc out of the epoxy plate, large enough to fit the flight controller, and fitted some nylon spacers on to it. I also added 4 holes for mounting the plate onto the Talon frame. The frame comes with some nylon spacers, meant for mounting a flight controller directly on top of it, and I use those positions for attaching the plate.

It is important to note which is the front side of the quad (see the small pencil-drawn arrow on the mounting plate). The flight controller has to be mounted with one specific side pointing forward. I will be flying in Quad-X mode, meaning that the front of the quad is in the middle between two arms. The mounting holes in the plate are positioned exactly right for this configuration.

Here’s an idea of how it looks when everything is stacked together:

  • Talon V2 frame with power distribution inside
  • ESCs strapped on the top plate of the frame, with motor-side wires on the inside, and power supply and controller wires on the outside
  • Epoxy plate mounted on the frame, with leads from the ESCs and the power supply wires for the Arduino coming through the hole in the center of the plate
  • Arduino mounted on top of the plate

The AeroQuad shield is missing from this picture, as is one other important part: the 2.4 Ghz receiver!

I actually forgot about the receiver when I placed my last order with Hobbyking, and this meant I had no wires to hook the receiver up to the flight controller. Add to your shopping list:

Now, putting it all together is not very difficult anymore. The things I’m going to skip for now are:

  • Adding a battery. I use a strap to attach it to the bottom plate of the frame.
  • Wiring the motors and the receiver to the AeroQuad shield
  • Calibrating the quad and all of the sensors with the AeroQuad Configurator software
  • Pairing transmitter and receiver and configuring AUX channels on the transmitter
  • Adding propellors

Fast forward to the (more or less) finished product:

Its maiden flight was on 8 September 2013.

Total expenses: US$ 593.04 + € 25.89, but that excludes some things I forgot to count:

  • 3.5mm polymax connectors
  • Lots and lots of tie-wraps 🙂

I think I’ll dedicate a later post to the complete shopping list.

1 2 3 4 12